
Fall baking transforms ordinary kitchen moments into magical experiences. My passion for creating festive bread recipes has led me to discover the most delightful pumpkin shaped bread that will steal the spotlight at any autumn gathering.
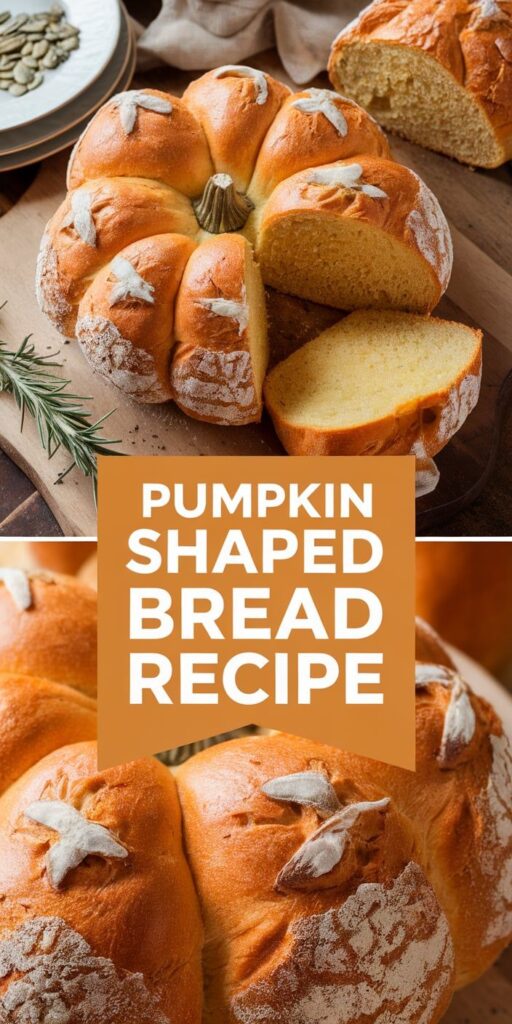
This unique pumpkin shaped bread isn’t just a recipe—it’s an edible art form that celebrates the warmth of fall. With its stunning visual design resembling a perfect pumpkin, this festive bread recipe brings creativity and seasonal charm to your table.
Crafting this pumpkin shaped bread requires some baking skills and a dash of imagination. Whether you’re preparing for Halloween parties or planning a cozy Thanksgiving breakfast, this recipe promises to impress family and friends with its intricate design and delicious flavor.
I’ll guide you through every step of creating this showstopping fall baking masterpiece. Get ready to transform simple ingredients into a bread that looks almost too beautiful to eat—but trust me, you’ll want to savor every bite.
Why This Pumpkin Shaped Bread Will Become Your Fall Favorite
Baking has always been my passion, but this pumpkin shaped bread takes fall favorite bread to a whole new level of deliciousness and creativity. The moment you pull this stunning loaf out of the oven, you’ll understand why it’s about to become the star of your holiday gatherings.
Perfect for Holiday Gatherings
Your holiday bread recipe isn’t just about taste—it’s about creating memories. This pumpkin shaped bread serves as both a conversation starter and a delectable centerpiece that will have your guests talking long after the meal ends. I love how versatile this recipe can be, fitting perfectly into autumn celebrations from Halloween to Thanksgiving.
- Stunning visual appeal
- Serves 8-10 people
- Can be prepared in advance
Instagram-Worthy Presentation
In the age of social media, presentation matters. This Instagram-worthy food creation will make your followers stop scrolling and start admiring. The intricate pumpkin shape transforms an ordinary bread into an edible work of art that captures the essence of fall.
Kid-Friendly Baking Project
Baking together creates lasting family memories. This bread recipe is simple enough for children to help, making it an ideal kitchen activity. Kids can assist with mixing ingredients, watching the dough rise, and even helping to shape the pumpkin design.
- Easy-to-follow steps
- Safe for children to participate
- Fun learning experience
Essential Ingredients for Your Pumpkin Shaped Bread Recipe
Fall baking essentials are all about creating delicious seasonal treats that warm your kitchen and delight your family. For the perfect pumpkin bread recipe, selecting the right pumpkin bread ingredients is crucial to achieving a moist, flavorful result.
I’ve carefully curated a list of ingredients that will transform your baking experience and bring the essence of autumn to your table. Quality matters when selecting each component of your pumpkin-shaped bread.
- All-purpose flour (2½ cups)
- Canned pumpkin puree (1 cup)
- Granulated sugar (1½ cups)
- Large eggs (2)
- Vegetable oil (½ cup)
- Baking soda (1 teaspoon)
- Salt (½ teaspoon)
- Ground cinnamon (2 teaspoons)
- Ground nutmeg (½ teaspoon)
- Vanilla extract (1 teaspoon)
Choosing high-quality ingredients can elevate your pumpkin bread from good to extraordinary. The combination of spices creates a warm, inviting aroma that captures the spirit of fall baking essentials.
| Ingredient Category | Purpose in Recipe | Recommended Type |
|---|---|---|
| Flour | Structure and texture | King Arthur All-Purpose Flour |
| Pumpkin Puree | Moisture and flavor | 100% Pure Pumpkin (Libby’s) |
| Spices | Depth of flavor | Fresh ground if possible |
I recommend using fresh ingredients and measuring precisely to ensure your pumpkin shaped bread turns out perfectly every time. The right combination of pumpkin bread ingredients will create a memorable autumn treat that everyone will love.
Kitchen Tools and Equipment You’ll Need
Creating the perfect pumpkin shaped bread requires some essential kitchen essentials and specialized baking tools. I’ll walk you through the equipment you’ll want to have on hand to make your bread-baking experience smooth and enjoyable.
When preparing to craft your pumpkin bread, having the right baking tools can make all the difference. Whether you’re a seasoned baker or a kitchen novice, this guide will help you gather everything you need.
Basic Baking Tools
Every home baker should have these fundamental kitchen essentials:
- Large mixing bowl
- Measuring cups and spoons
- Whisk or electric mixer
- Silicone spatula
- Baking sheet or bread pan
- Cooling rack
Special Bread Shaping Equipment
To achieve the distinctive pumpkin shape, you’ll want some specialized bread shaping equipment:
| Tool | Purpose | Recommended Brand |
|---|---|---|
| Pumpkin-shaped silicone mold | Create perfect pumpkin shape | Nordic Ware |
| Kitchen twine | Create ridge details | Regency Natural Cooking Twine |
| Dough scraper | Shape and manipulate dough | OXO Good Grips |
Optional Decorating Tools
For bakers who want to add extra flair, consider these optional decorating tools:
- Food-safe paintbrush
- Edible food coloring
- Pastry brush
- Stencils for detailed designs
Don’t worry if you don’t have every single item. Creativity and passion are the most important ingredients in any baking adventure!
Step-by-Step Mixing and Dough Preparation
Crafting the perfect pumpkin-shaped bread starts with mastering bread dough preparation. I’ll walk you through the essential mixing techniques that will transform your basic ingredients into a delightful autumn treat.
Begin by gathering all your ingredients at room temperature. This crucial step ensures even mixing and optimal dough development. Precise measurements are key to successful bread dough preparation.
- Combine dry ingredients in a large mixing bowl:
- Flour
- Yeast
- Salt
- Sugar
- Spices
- Create a well in the center of the dry ingredients
- Add wet ingredients gradually
- Mix using proper mixing techniques
When mixing techniques come into play, I recommend using a stand mixer with a dough hook for consistent results. Knead the dough until it becomes smooth and elastic, typically 8-10 minutes. The dough should feel slightly tacky but not stick to your hands.
| Mixing Stage | Duration | Expected Result |
|---|---|---|
| Initial Mixing | 2-3 minutes | Ingredients combined |
| Kneading | 8-10 minutes | Smooth, elastic dough |
| First Rise | 1-2 hours | Doubled in size |
Pro tip: Check your dough’s windowpane test by stretching a small piece. If it stretches thin without breaking, you’ve achieved perfect gluten development.
Remember, patience is your best friend in bread dough preparation. Take your time, and you’ll create a stunning pumpkin-shaped bread that’s sure to impress.
Shaping Techniques for Perfect Pumpkin Bread Design
Mastering bread shaping techniques transforms an ordinary loaf into a stunning decorative bread that captures the essence of autumn. Pumpkin design requires patience, skill, and a gentle touch to create a beautiful bread that looks as amazing as it tastes.
The art of creating a pumpkin-shaped bread involves several key steps that will elevate your baking skills and impress your guests. I’ll walk you through the most essential techniques to achieve a professional-looking pumpkin bread.
Creating the Signature Ridges
To achieve the distinctive pumpkin shape, you’ll need to master a specific shaping method. Here are the key steps:
- Divide your dough into an even, round ball
- Use kitchen twine or strips of fabric to create vertical lines
- Gently tie the twine around the dough to form 6-8 equal segments
- Carefully press between the twine lines to create realistic pumpkin ridges
Adding Stem and Leaf Details
The finishing touches make your decorative bread truly special. I recommend using a small piece of dough to craft a realistic stem:
- Roll a small amount of dough into a short, thick cylinder
- Attach the stem to the top center of your pumpkin bread
- Create small leaf shapes using excess dough
- Gently press leaf details onto the surface for added texture
Surface Scoring Patterns
Surface scoring adds depth and character to your bread design. Use a sharp razor or scoring knife to create delicate patterns that enhance the pumpkin appearance. Light, quick cuts work best to maintain the dough’s structure.
Remember, practice makes perfect when it comes to bread shaping techniques. Don’t get discouraged if your first attempt isn’t flawless. Each loaf will improve your skills and bring you closer to creating the perfect pumpkin-designed bread.
Baking Temperature and Timing Guidelines
Achieving the perfect pumpkin shaped bread depends on precise bread baking temperature and oven settings. I’ll guide you through the critical steps to ensure your bread turns out golden and delicious every time.
For this pumpkin shaped bread, you’ll want to preheat your oven to 375°F (190°C). This specific baking temperature helps create a beautiful golden crust while maintaining the bread’s delicate interior. Preheating is crucial – give your oven at least 20 minutes to reach the full temperature before placing the bread inside.
- Ideal bread baking temperature: 375°F (190°C)
- Preheating time: 20 minutes
- Recommended baking time: 35-40 minutes
During baking, keep an eye on your bread’s color and texture. The baking time can vary slightly depending on your specific oven. Look for these key signs of doneness:
- Deep golden-brown exterior
- Hollow sound when tapping the bottom of the bread
- Internal temperature reaches 190-200°F when tested with a kitchen thermometer
Pro tip: If the bread’s surface browns too quickly, cover it loosely with aluminum foil to prevent burning while ensuring the inside bakes completely. Always place the bread on the center rack for most consistent oven settings and even baking.
Decorating and Finishing Touches
The final step in creating a show-stopping pumpkin shaped bread is all about the decorative details. Bread glazing transforms an ordinary loaf into a culinary masterpiece, elevating your food presentation to new heights. I’ll share some expert techniques to make your seasonal decorations truly memorable.
Glazing Options to Enhance Flavor and Appearance
Glazing is an art form that can dramatically improve both the taste and visual appeal of your bread. I recommend trying these delicious glaze variations:
- Maple Cream Glaze: Perfect for autumn-inspired breads
- Cinnamon Sugar Drizzle: Adds warmth and sweetness
- Cream Cheese Glaze: Creates a rich, tangy finish
Creative Seasonal Embellishments
Seasonal decorations can transform your pumpkin shaped bread from simple to spectacular. Consider these food presentation techniques:
- Edible Leaf Decorations: Use rosemary or thyme sprigs
- Seed Toppings: Sprinkle pumpkin or sunflower seeds
- Jack-o’-lantern Face: Create playful facial features
| Decoration Type | Difficulty Level | Visual Impact |
|---|---|---|
| Maple Glaze | Easy | High |
| Seed Topping | Medium | Medium |
| Carved Face | Advanced | Very High |
Remember, the key to stunning bread decorations is creativity and personal touch. Don’t be afraid to experiment with different glazing and embellishment techniques to make your pumpkin shaped bread truly unique!
Storage Tips and Serving Suggestions
After baking your beautiful pumpkin shaped bread, proper bread storage becomes crucial to maintain its delightful texture and flavor. I recommend storing the bread at room temperature in an airtight container or sealed plastic bag for up to three days. If you want to extend the bread’s freshness, wrapping it tightly in plastic wrap and then aluminum foil can help preserve its moisture and prevent staleness.
For serving ideas, this seasonal bread pairs wonderfully with warm beverages like spiced apple cider or pumpkin spice lattes. I love transforming leftover bread into delectable french toast or breadcrumbs for autumn-inspired recipes. Toasting thin slices and spreading them with maple butter creates an irresistible breakfast or afternoon snack that highlights the bread’s rich, warm flavors.
When planning to serve the bread at gatherings, consider cutting it into attractive slices and arranging them on a rustic wooden board with seasonal garnishes like cinnamon sticks or mini gourds. If you have extra bread that won’t be consumed quickly, freezing is an excellent option. Wrap individual portions in freezer-safe bags, where they can remain fresh for up to one month. Simply thaw at room temperature when you’re ready to enjoy another slice of autumn goodness.
Remember that homemade bread tastes best when shared with loved ones. Your pumpkin shaped creation isn’t just a recipe—it’s an experience that brings warmth and joy to any fall celebration.


