
Welcome to my ultimate glazed ham recipe that will transform your holiday meal from ordinary to extraordinary! A festive main dish like this ham becomes the centerpiece of any special gathering, bringing families together with its irresistible aroma and delectable flavor.
Creating the perfect glazed ham recipe isn’t just about cooking—it’s about crafting a memorable dining experience. I’ve spent years perfecting this technique to ensure every slice is packed with mouthwatering sweetness and savory goodness. Whether you’re preparing a Christmas dinner or a Sunday family feast, this holiday ham will definitely impress your guests.
From selecting the right cut to mastering the glaze, I’ll guide you through each step with simple, clear instructions. My goal is to help home cooks like you create a stunning centerpiece that looks professionally prepared but is surprisingly easy to make.
Get ready to discover the secrets of a truly remarkable glazed ham that will have everyone asking for seconds. With my foolproof method, you’ll transform an ordinary ham into a culinary masterpiece that celebrates tradition and flavor.
The Best Glazed Ham Recipe for Your Special Occasion
Selecting the right ham can make or break your holiday feast. I’ve learned through years of cooking that understanding different ham types is crucial for creating a delicious centerpiece that will impress your guests.
When choosing a ham, you’ll encounter several key options that can impact your cooking experience and final result.
Traditional vs Spiral-Cut Ham Choices
Spiral-cut ham offers convenience and easier serving, while traditional whole hams provide more flexibility in preparation. Here are the key differences:
- Spiral-cut ham: Pre-sliced, easier to serve
- Traditional ham: Whole cut, requires manual slicing
- Spiral-cut hams typically cook faster
- Traditional hams allow more customized glazing
Understanding Ham Types and Sizes
Ham types vary based on their cut and preparation method. Let me break down the most common ham types for you:
- Bone-in ham: Rich flavor, more challenging to carve
- Boneless ham: Easy to slice, uniform shape
- Country ham: Saltier, dry-cured variety
- City ham: Most common, wet-cured and milder
Pre-Cooked vs Raw Ham Selection
When planning your meal, understanding pre-cooked ham versus raw ham is essential. Pre-cooked ham reduces cooking time and simplifies preparation, making it ideal for home cooks with limited experience.
My recommendation is to choose a pre-cooked ham for your first attempts at glazing. These hams are forgiving and require less precise temperature monitoring compared to raw hams.
Pro tip: Always check the weight of your ham to determine proper cooking time and ensure you have enough to feed your guests.
Essential Ingredients for a Mouthwatering Ham Glaze
Creating the perfect ham glaze requires a careful balance of sweet and savory glaze ingredients that transform an ordinary ham into a culinary masterpiece. I’ll share my favorite recipe that brings out the most delicious flavors and creates a stunning caramelized exterior.
For an exceptional ham glaze, you’ll want to gather these key ingredients:
- 1/2 cup brown sugar
- 1/4 cup honey or maple syrup
- 2 tablespoons Dijon mustard
- 1/4 cup apple cider vinegar
- 2 cloves minced garlic
- 1 teaspoon ground black pepper
The magic of ham glaze ingredients lies in their ability to create a perfect flavor profile. Brown sugar provides sweetness, while Dijon mustard adds a tangy kick. The apple cider vinegar brings a subtle acidity that cuts through the richness of the ham.
For those with dietary restrictions, I recommend these simple substitutions:
- Use coconut sugar instead of brown sugar
- Replace honey with agave nectar
- Choose a gluten-free Dijon mustard
My sweet and savory glaze recipe works perfectly with both spiral-cut and traditional hams. The key is to mix the ingredients thoroughly and apply the glaze during the last 30 minutes of cooking to prevent burning while achieving a beautiful caramelized finish.
How to Prepare Your Ham Before Glazing
Preparing a delicious ham requires careful attention to detail before the glazing process begins. Ham preparation involves several critical steps that will ensure your final dish is both safe and incredibly flavorful. By mastering these key techniques, you’ll transform an ordinary ham into a spectacular centerpiece for your meal.
Proper Thawing Techniques for Ham
Thawing ham safely is crucial to prevent bacterial growth and maintain meat quality. I recommend using one of these three methods:
- Refrigerator thawing: Place the ham in its original packaging on a tray and allow 4-5 hours per pound of ham
- Cold water thawing: Submerge the sealed ham in cold water, changing water every 30 minutes
- Microwave thawing: Use the defrost setting, rotating and checking frequently
Scoring the Ham Surface
Scoring ham creates an attractive diamond pattern while helping the glaze penetrate deeper into the meat. To score ham effectively:
- Use a sharp knife to make shallow cuts across the ham’s surface
- Create diagonal lines approximately 1 inch apart
- Cut about 1/4 inch deep without piercing completely through the meat
Temperature and Timing Basics
Understanding temperature and timing is essential for ham preparation. Pre-cooked hams require less cooking time compared to raw hams. Always use a meat thermometer to ensure the internal temperature reaches 140°F for pre-cooked hams and 145°F for raw hams.
By following these ham preparation techniques, you’ll set the stage for a perfectly glazed and delicious main course that will impress your guests.
Creating the Perfect Sweet and Savory Glaze
Crafting a delicious homemade ham glaze is easier than you might think. The secret lies in balancing flavors and achieving the right glaze consistency that will make your ham irresistible. I’ll walk you through a simple yet delectable glaze recipe that will elevate your holiday centerpiece.
To start your homemade ham glaze, you’ll need a few key ingredients:
- 1/2 cup brown sugar
- 1/4 cup Dijon mustard
- 1/4 cup honey
- 2 tablespoons apple cider vinegar
- 1 teaspoon ground cloves
Creating the perfect glaze consistency requires careful mixing and heating. I recommend whisking these ingredients in a saucepan over medium heat until they blend smoothly. The goal is to create a thick, glossy mixture that will cling beautifully to your ham’s surface.
Pro tip: Taste your glaze before applying. You can adjust the sweetness by adding more honey or brown sugar, or increase tanginess with extra vinegar. Remember that the glaze will caramelize during baking, intensifying its flavors.
When you’re ready to glaze, apply the mixture generously during the last 30 minutes of cooking. This prevents burning while ensuring a beautiful, glossy finish that will impress your guests.
Baking and Glazing Techniques for Maximum Flavor
Preparing a delicious ham requires precision and care. The right baking and glazing techniques can transform an ordinary ham into an extraordinary centerpiece for your meal. I’ll share my expert tips for creating a mouthwatering glazed ham that will impress your guests.
Mastering the Basting Schedule
Basting ham is crucial for maintaining moisture and developing rich flavors. I recommend creating a consistent basting schedule to ensure even coverage and maximum taste. Here’s a strategic approach:
- Begin basting 30 minutes into cooking
- Repeat every 20-25 minutes
- Use a basting brush for even application
- Apply glaze generously but not excessively
Temperature Monitoring Essentials
Tracking ham cooking temperature is critical for perfect results. Use a reliable meat thermometer to ensure safe and delicious cooking:
| Ham Type | Internal Temperature | Cooking Time |
|---|---|---|
| Pre-cooked Ham | 140°F | 10-14 minutes per pound |
| Raw Ham | 145°F | 20-25 minutes per pound |
Achieving Caramelized Ham Perfection
Creating a caramelized ham requires careful attention to detail. I suggest these techniques for developing that beautiful golden-brown exterior:
- Start glazing during the last 30-45 minutes of cooking
- Increase oven temperature slightly for caramelization
- Watch carefully to prevent burning
- Let ham rest 15-20 minutes after removing from oven
By following these baking and glazing techniques, you’ll create a show-stopping ham that’s both visually stunning and incredibly delicious. The key is patience, attention to detail, and a willingness to experiment with flavors.
Serving and Storage Recommendations
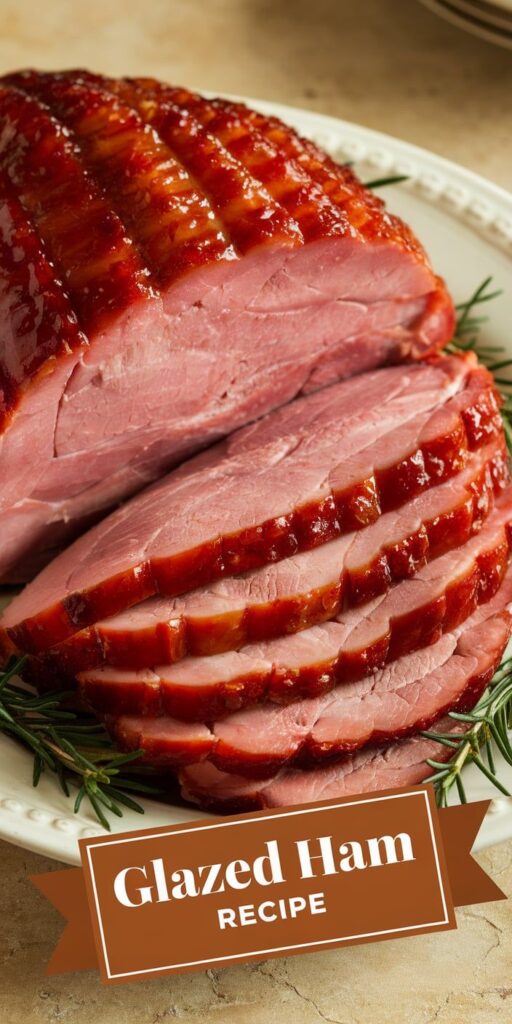
When serving glazed ham, presentation matters. I recommend placing your beautifully caramelized ham on a large platter surrounded by fresh rosemary sprigs or roasted seasonal vegetables. Carve thin, elegant slices against the grain to ensure maximum tenderness and visual appeal. A sharp carving knife will help you achieve professional-looking results that will impress your dinner guests.
Storing leftover ham requires careful attention to food safety. After your meal, wrap the remaining ham tightly in aluminum foil or store in an airtight container. Refrigerated ham typically remains fresh for 3-4 days when properly sealed. For longer storage, you can freeze ham portions for up to two months. When reheating, warm the ham gently to prevent drying out and maintain its delicious glazed exterior.
Creative leftover ham ideas can transform your remaining meat into exciting new dishes. Try dicing the ham for hearty omelets, adding it to potato soup, or creating a delightful ham and cheese quiche. These repurposed recipes ensure that not a single bite of your delectable glazed ham goes to waste. By thinking creatively about serving and storing your ham, you’ll maximize both flavor and value.


