
Prepare to embark on a delightful culinary adventure with my irresistible Hello Kitty strawberry cake recipe. This kawaii dessert combines the adorable world of Hello Kitty with a mouthwatering strawberry cake that will capture hearts and taste buds alike.
Baking this Hello Kitty cake is more than just creating a dessert – it’s about crafting an experience that brings joy and whimsy to your kitchen. Whether you’re planning a birthday party, a special celebration, or simply want to surprise loved ones, this strawberry cake recipe is guaranteed to create magical moments.
In the following sections, I’ll guide you through every step of creating this enchanting kawaii dessert. From selecting the perfect ingredients to mastering the intricate Hello Kitty design, you’ll discover how to transform a simple cake into a work of edible art that will delight both children and adults.
Get ready to unleash your inner pastry chef and create a strawberry cake that’s as cute as it is delicious!
Why This Hello Kitty Strawberry Cake Recipe Will Steal Your Heart
Dive into the delightful world of Hello Kitty-themed baking, where creativity meets culinary magic! This special strawberry cake isn’t just a dessert – it’s an experience that brings joy to any celebration.
Origins of Hello Kitty-Themed Baking
Hello Kitty has captured hearts worldwide since her creation in 1974. Bakers quickly discovered the magic of transforming ordinary cakes into kawaii cake occasions that spark instant smiles. From Japan to global kitchens, Hello Kitty-themed baking has become a beloved art form that combines cute design with delicious flavors.
What Makes This Recipe Special
- Perfectly balanced strawberry flavor that’s not too sweet
- Easy-to-follow decorating techniques for home bakers
- Adorable Hello Kitty design that impresses both kids and adults
- Uses simple ingredients found in most home kitchens
My recipe takes the classic strawberry cake to new heights, creating a dessert that’s as beautiful as it is delicious. The combination of soft cake, creamy frosting, and iconic Hello Kitty design makes this a truly unique culinary creation.
Perfect Occasions for This Cake
Whether you’re planning a child’s birthday, a themed party, or just want to bring a smile to someone’s face, this Hello Kitty strawberry cake fits every occasion. It’s more than just a dessert – it’s a celebration of creativity and joy.
I’ve crafted this recipe to be accessible to bakers of all skill levels. With a few simple techniques and some creativity, you can transform an ordinary cake into an extraordinary Hello Kitty masterpiece that will delight everyone who sees it.
Essential Ingredients and Kitchen Tools
Crafting the perfect Hello Kitty strawberry cake requires carefully selected Hello Kitty cake ingredients and the right kawaii baking supplies. I’ll walk you through everything you’ll need to create this adorable dessert that will delight both kids and adults alike.
Cake Ingredients
- 2 cups all-purpose flour
- 1½ cups fresh strawberries (pureed)
- 1 cup unsalted butter
- 2 cups granulated sugar
- 4 large eggs
- 1 tsp vanilla extract
- Pink food coloring
- White fondant for decoration
Essential Strawberry Cake Tools
Preparing this kawaii baking masterpiece requires specific strawberry cake tools to ensure success. I recommend having the following equipment ready:
- 9-inch round cake pans
- Electric mixer
- Offset spatula
- Piping bags and tips
- Fondant tools
- Hello Kitty stencil or cookie cutter
- Cake turntable
Each tool plays a crucial role in creating the perfect Hello Kitty strawberry cake. The right equipment transforms a simple recipe into a delightful kawaii baking experience that looks as amazing as it tastes.
Pro tip: Always use fresh, high-quality ingredients for the best strawberry cake results. Fresh strawberries and real vanilla extract make a significant difference in your final creation.
Step-by-Step Hello Kitty Strawberry Cake Recipe
Creating the perfect Hello Kitty strawberry cake requires precision and creativity. I’ll walk you through each step of crafting this delightful dessert that will wow both kids and adults alike. My strawberry cake base recipe combines classic baking techniques with adorable decoration.
Preparing the Strawberry Cake Base
To start your strawberry cake base recipe, gather these key ingredients:
- 2 cups all-purpose flour
- 1 1/2 cups fresh strawberries, pureed
- 1 cup unsalted butter, softened
- 2 cups granulated sugar
- 4 large eggs
- 1 teaspoon vanilla extract
- 1/2 cup milk
Baking steps for the perfect strawberry cake base:
- Preheat oven to 350°F
- Cream butter and sugar until fluffy
- Add eggs one at a time
- Mix in strawberry puree and vanilla
- Gradually incorporate dry ingredients
- Pour batter into greased 9-inch cake pans
- Bake for 30-35 minutes
Making the Perfect Pink Frosting
My pink frosting tutorial ensures a smooth, vibrant decorating experience. I recommend using gel food coloring for the most intense pink shade.
| Ingredient | Quantity |
|---|---|
| Powdered sugar | 4 cups |
| Unsalted butter | 1 cup |
| Heavy cream | 1/4 cup |
| Pink gel food coloring | 2-3 drops |
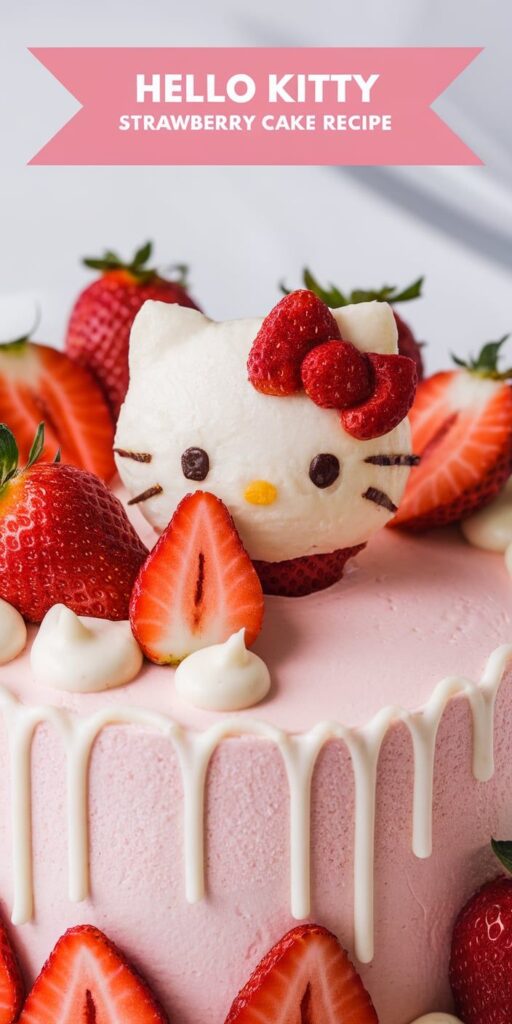
Creating Hello Kitty’s Facial Features
For Hello Kitty cake decoration, use white fondant or royal icing to craft her iconic face. Carefully pipe black eyes and whiskers, and create a cute red bow using additional fondant.
Decorating Tips and Techniques for the Perfect Hello Kitty Design
Mastering Hello Kitty cake decorating requires precision and creativity. I’ll share professional kawaii cake techniques that will transform your strawberry cake design into a delightful masterpiece.
To achieve a flawless Hello Kitty appearance, start with smooth frosting. Use a bench scraper to create clean, even surfaces that provide the perfect canvas for decorating. White fondant works best for creating Hello Kitty’s iconic features.
- Use a fine-tipped piping bag for precise facial details
- Select food-grade coloring for vibrant strawberry cake design
- Practice Hello Kitty’s signature bow placement
- Invest in quality decorating tools
Color selection plays a crucial role in kawaii cake techniques. Stick to soft pastel shades that complement the strawberry cake’s natural pink hues. I recommend using gel food coloring for more intense, uniform colors.
| Decoration Element | Recommended Technique | Difficulty Level |
|---|---|---|
| Hello Kitty Face | Fondant Cut-Out | Intermediate |
| Bow Detail | Royal Icing Piping | Advanced |
| Background Design | Smooth Buttercream | Beginner |
Remember, practice makes perfect in Hello Kitty cake decorating. Don’t get discouraged if your first attempt isn’t flawless. Each cake is an opportunity to refine your kawaii cake techniques.
Storage Tips and Serving Suggestions
After crafting your adorable Hello Kitty cake, proper storage is key to maintaining its delightful appearance and delicious flavor. I recommend storing the strawberry cake in an airtight container in the refrigerator. Typically, your kawaii dessert presentation will stay fresh for 3-4 days when carefully covered with plastic wrap or placed in a cake keeper.
Serving this Hello Kitty cake becomes an art form all its own. I suggest removing the cake from the refrigerator about 30 minutes before serving to allow it to come to room temperature. This helps enhance the strawberry flavors and ensures the frosting remains smooth. For an extra special Hello Kitty cake storage technique, use a cake dome with a tight seal to protect the delicate decorations.
When it comes to strawberry cake serving ideas, I love creating a themed dessert experience. Pair your Hello Kitty masterpiece with pink lemonade or strawberry milk to complement the cake’s flavor profile. For added kawaii dessert presentation, consider using Hello Kitty-themed plates or adding small decorative picks that match the cake’s adorable design.
Pro tip for cake enthusiasts: If you’re not planning to serve the entire cake at once, slice and store individual portions separately. This method helps preserve the cake’s moisture and prevents the entire dessert from drying out. Your Hello Kitty strawberry cake will remain as charming and delicious as the moment you first created it!


