
Fall baking gets an exciting twist with this incredible pumpkin roll recipe that transforms ordinary ingredients into a spectacular dessert. As a passionate home baker, I’ve perfected a simple technique that makes creating this classic fall dessert easier than you might imagine.
My easy recipe delivers a moist pumpkin cake rolled with rich cream cheese filling that will impress everyone at your holiday gathering. The key is understanding each step and using fresh, quality ingredients that bring out the warmest autumn flavors.
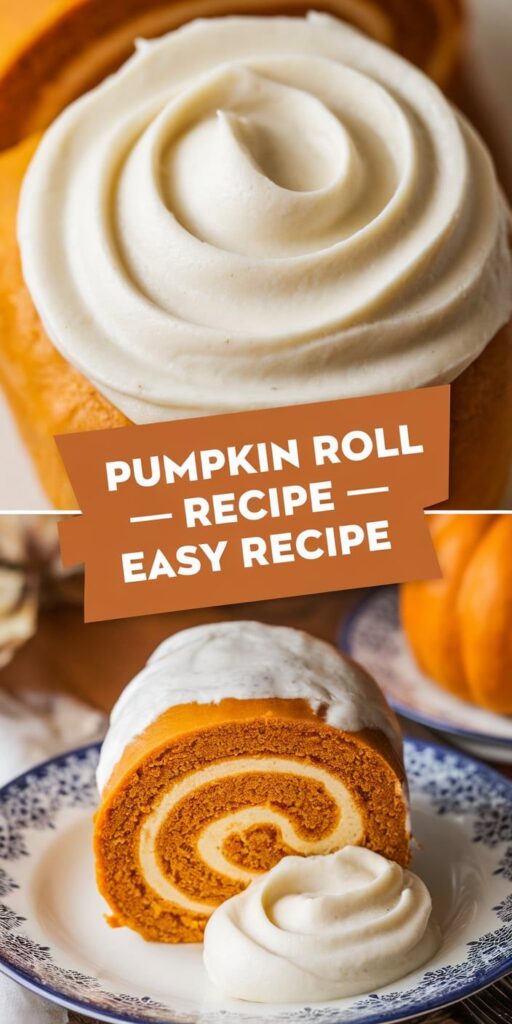
Whether you’re a beginner baker or a seasoned pro, this pumpkin roll recipe promises a delightful treat that looks professionally made but comes together with minimal kitchen skills. Each slice reveals a beautiful spiral of spiced cake and creamy filling that screams comfort and celebration.
Get ready to discover a foolproof method for crafting the most delectable fall dessert that will become your new seasonal tradition. Let’s dive into the world of pumpkin roll magic!
The Best Classic Pumpkin Roll Recipe Easy Recipe
Creating the perfect classic pumpkin roll doesn’t have to be intimidating. My foolproof recipe will transform your baking experience and help you craft a delightful dessert that looks professional and tastes incredible. With the right approach and some key techniques, anyone can master this beautiful autumn treat.
Why This Recipe Never Fails
What sets this classic pumpkin roll apart is its reliability. I’ve developed a recipe that eliminates common baking pitfalls by focusing on precise measurements and simple techniques. The secret lies in understanding how ingredients interact and using the right baking tools to achieve consistent results.
- Perfectly balanced moisture content
- Precise ingredient measurements
- Tested rolling techniques
- Easy-to-follow instructions
Essential Kitchen Tools You’ll Need
Successful baking starts with having the right baking tools. For this classic pumpkin roll, I recommend gathering these key items before you begin:
- Jelly roll pan (15×10 inches)
- Parchment paper
- Electric mixer
- Kitchen towel
- Cooling rack
- Offset spatula
Time and Serving Size Overview
Planning is crucial when preparing this delightful dessert. Here’s a quick breakdown of what to expect:
| Preparation Time | Baking Time | Total Time | Servings |
|---|---|---|---|
| 25 minutes | 15 minutes | 2 hours | 8-10 slices |
Fresh Ingredients for Your Perfect Pumpkin Roll
Creating a delicious pumpkin roll starts with selecting the right pumpkin roll ingredients. The magic of this dessert lies in the careful balance of flavors and textures that come together to create a memorable treat.
Cake Batter Components
My perfect cake batter requires a precise blend of ingredients that bring out the rich pumpkin flavor. Here are the key components you’ll need:
- 1 cup all-purpose flour
- 1 teaspoon baking powder
- 1/2 teaspoon salt
- 1 teaspoon ground cinnamon
- 1/2 teaspoon ground nutmeg
- 3 large eggs
- 1 cup granulated sugar
- 2/3 cup canned pumpkin puree
Cream Cheese Filling Ingredients
The cream cheese filling is the heart of this dessert. I recommend using these ingredients for the smoothest, most delectable filling:
- 8 ounces cream cheese, softened
- 1 cup powdered sugar
- 1/4 cup unsalted butter, softened
- 1 teaspoon vanilla extract
Optional Garnishes and Toppings
To elevate your pumpkin roll, consider these optional garnishes that add both visual appeal and extra flavor:
- Dusting of powdered sugar
- Chopped pecans or walnuts
- Drizzle of caramel sauce
- Sprinkle of ground cinnamon
Pro tip: Ensure all ingredients are at room temperature for the best mixing and texture. Fresh, high-quality ingredients make all the difference in creating a show-stopping pumpkin roll that will impress your family and friends.
Step-by-Step Mixing and Baking Instructions
Mastering pumpkin roll baking instructions requires precision and careful technique. I’ll walk you through the entire cake batter mixing process to ensure your dessert turns out perfectly every time.
Start by preheating your oven to 375°F and preparing a 15×10-inch jelly roll pan. Line the pan with parchment paper and lightly grease it to prevent sticking during the cake batter mixing process.
- Combine dry ingredients in a medium bowl:
- Flour
- Baking powder
- Baking soda
- Ground cinnamon
- Ground nutmeg
- Salt
- In a separate large bowl, whisk together:
- Eggs
- Sugar
- Pumpkin puree
- Vanilla extract
- Gradually fold dry ingredients into wet mixture
- Spread batter evenly in prepared pan
Baking the pumpkin roll requires careful attention. Bake for 13-15 minutes until the cake springs back when lightly touched. The cake should be golden and slightly pulling away from pan edges.
| Baking Stage | Temperature | Time |
|---|---|---|
| Preheating | 375°F | 10 minutes |
| Baking Cake | 375°F | 13-15 minutes |
Pro tip: Watch your cake closely during the last few minutes of baking. Overcooking can lead to a dry, cracked roll that’s difficult to manage.
Essential Rolling Technique for Perfect Spirals
Mastering the pumpkin roll technique can be challenging for many home bakers. The key to a stunning dessert lies in understanding the delicate process of rolling and cooling your cake without causing unwanted cracks.
Creating a flawless pumpkin roll requires precision and careful handling. I’ll share my top strategies to ensure your cake rolls perfectly every single time.
How to Prevent Cake Cracking
Preventing cake cracking starts with immediate action after baking. The moment your cake comes out of the oven, you’ll want to take these critical steps:
- Immediately loosen the cake from the pan edges
- Dust a clean kitchen towel with powdered sugar
- Flip the warm cake onto the prepared towel
- Roll the cake while it’s still warm and flexible
Proper Cooling Methods
Cooling is crucial in the pumpkin roll technique. I recommend letting the rolled cake cool completely at room temperature. This helps set the shape and prevents moisture buildup that could lead to soggy edges.
Rolling Tips for Beginners
For those new to making pumpkin rolls, remember these key tips:
- Use parchment paper for easy cake removal
- Roll the cake slowly and gently
- Don’t press too hard while rolling
- Allow sufficient cooling time before unrolling
By following these methods to prevent cake cracking and using proper cooling techniques, you’ll create a professional-looking pumpkin roll that’s sure to impress.
Creating the Creamy Filling and Assembly
Crafting the perfect cream cheese filling is crucial for a delicious pumpkin roll. I’ll walk you through the process of making a smooth, luxurious filling that will elevate your dessert to bakery-level deliciousness.
For the cream cheese filling, you’ll need these key ingredients:
- 8 ounces cream cheese, softened
- 1 cup powdered sugar
- 1/4 cup unsalted butter, softened
- 1 teaspoon vanilla extract
My secret to a perfect cream cheese filling is to ensure all ingredients are at room temperature. Start by beating the cream cheese until smooth and creamy. Gradually add powdered sugar, mixing on low speed to prevent a powdery mess. Incorporate butter and vanilla, blending until the mixture is silky and free of lumps.
For the pumpkin roll assembly, carefully unroll the cooled cake on a clean kitchen towel. Spread the cream cheese filling evenly, leaving a small border around the edges to prevent overflow. Use an offset spatula for the most uniform distribution.
Gently roll the cake back up, using the towel to help create a tight, even spiral. Pro tip: Roll from the short end for the most consistent shape. Once rolled, wrap in plastic wrap and refrigerate for at least an hour to set the filling and help the roll maintain its shape.
The key to a beautiful pumpkin roll is patience and gentle handling during the cream cheese filling and pumpkin roll assembly. With practice, you’ll create a stunning dessert that looks as amazing as it tastes!
Storage Tips and Make-Ahead Options
Preserving your delicious pumpkin roll is easier than you might think. Pumpkin roll storage can be simple and straightforward, giving you flexibility for make-ahead desserts that taste just as amazing days later.
My favorite approach to freezing desserts involves careful preparation and storage techniques that maintain the roll’s delightful texture and flavor.
Freezing Your Pumpkin Roll
Freezing a pumpkin roll is an excellent way to prepare desserts in advance. Follow these steps for perfect preservation:
- Wrap the entire roll tightly in plastic wrap
- Place the wrapped roll in a freezer-safe container
- Store in the freezer for up to 2-3 months
Refrigeration Guidelines
For short-term storage, refrigeration works wonderfully. A properly stored pumpkin roll can last 3-5 days in the refrigerator when wrapped securely in plastic wrap or placed in an airtight container.
Thawing Recommendations
When you’re ready to enjoy your frozen pumpkin roll, follow these thawing steps:
- Remove from freezer and unwrap
- Place in refrigerator overnight
- Allow to sit at room temperature for 30 minutes before serving
Pro tip: Always slice and serve your pumpkin roll chilled for the best taste and presentation.
Troubleshooting Common Pumpkin Roll Problems
When diving into pumpkin roll troubleshooting, I’ve learned that even experienced bakers can encounter challenges. Cracking is the most frequent baking problem home cooks face when creating this delicate dessert. The key to preventing cracks lies in carefully rolling the cake while it’s still warm and using a clean kitchen towel dusted with powdered sugar.
Texture issues can derail your dessert fixes if you’re not careful. I recommend checking your oven temperature with a reliable thermometer and ensuring you don’t overbake the thin cake layer. Overbaking leads to dry, brittle edges that are prone to cracking when you attempt to roll the pumpkin roll. Moisture is crucial – a slightly underbaked cake will be more pliable and forgiving.
Filling problems can also frustrate home bakers. If your cream cheese filling seems too runny, refrigerate it for 15-20 minutes before spreading. Soft butter and room temperature cream cheese help create the perfect consistency. When rolling, spread the filling evenly, leaving a small border to prevent oozing. With practice, you’ll master the art of creating a picture-perfect pumpkin roll that looks as delicious as it tastes.
Remember, every baking challenge is an opportunity to improve your skills. Don’t get discouraged if your first attempt isn’t perfect. Each pumpkin roll you make will teach you something new about technique, precision, and the joy of creating a stunning dessert.


